
 |
-- Incoming Flash Message --
The directed energy weapons conceived and developed by Nikola Tesla have had an immediate and incredibly successful impact upon the battlefield. Even the most heavily-armoured vehicles are vulnerable to electricity and through the utilisation of the dispersion setting, squads of infantry can be attacked just as easily.
Although a relatively short ranged weapon system, their effectiveness has made them very popular with the crews that have been equipped with them and while the glow of the Tesla Cannon’s coils can make ambushes and fighting at night difficult, the psychological effect of the weapon upon the enemy makes these minor drawbacks at most.
-- Message Ends --
You might remember that in concluding my last 15mm Weird War project I mentioned that Clockwork Goblin Miniatures had included a Sherman turret equipped with a Tesla Cannon with the Grizzly Medium Walker that I ordered... Well last month I picked up a Sherman chassis to mount it on so I could get it painted up.


For the turret, being sure to check, double check and then check again that your polarity is correct, glue your 2mm x 2mm magnets into the hole in the locator lug being careful to wipe away any glue that is forced out as you're inserting the magnets.

You might have notice that with the way I've magnetised, the magnets aren't actually in contact with one another, this isn't an issue as they're strong enough to hold the turret in place regardless, but there is probably a 'better' way of doing it than the way I have for those with a wider selection of magnet sizes.
Now you can assemble the rest of the hull and you'll have an M4A9E8 tank ready to rock and roll. As I was completing the build, I opted to add extra armour panels from the plastic kit to the turret - reasoning that given the potency of the tesla cannon their tank is equipped with, the crew have decided that taking some extra precautions isn't a bad idea. Although it's tricky to see in this photo, I also carefully removed the a-frame travel lock for the 76mm gun from the glacis plate, though left the mounting brackets for it in place as I feel it adds a little narrative to the tank, perhaps it was originally equipped with a 76mm gun and has been retrofit, or maybe it was equipped with a tesla cannon when it rolled off the production line in Detroit?


Like the Grizzly and Coyote Walkers, this project presented a few challenges but again it's been incredibly enjoyable and encouraged me to push my painting abilities a little further as well.
Preamble
Unlike either of the two previous projects, this one would be combining a resin turret upgrade from Clockwork Goblin Miniatures with a plastic tank chassis from Battlefront Miniatures. On the face of it, this was a pretty simple operation and was definitely filled with much less apprehension than the construction of the resin/metal Grizzly but as I was prepping for the build I remembered reading about magnetising the turrets of Battlefront Miniatures tanks so that they could be rotated and I figured I'd give that a go as well. Now, if I'm honest, this dramatically increased the build time, which would have been 'mere minutes' if I'd been building the stock kit, which just goes to show how well designed Battlefront kits are, more on this below though.
The kit comes as a single frame moulded in dark green plastic and includes a number of optional parts, including additional armour panels and stowage:
Before I get to assembly, I want to take a moment to talk about the reason for selecting the M4A3E8 (Easy Eight) chassis to mount the turret on, which actually came from two separate ideas. The first was an aesthetic one - I just really like the look of the Easy Eight with it's Horizontal Volute Suspension System, wider tracks and up armoured hull, it just looks good, though I will confess to being one of those who was inspired to look at historical wargaming by watching the 2014 movie Fury which just so happens to feature an Easy Eight...
The second reason for the choice was a little more grounded in 'reality' (inasmuch as one can talk about reality in a weird war setting) but my line of thinking essentially went as follows: the Easy Eight came into service in 1944 going on to be used well after 1945, including in the Korean and Vietnam wars. So it made sense to me that in the alternative timeline of Konflikt '47 there would be more than a few of these tanks still kicking about, and it wouldn't be inconceivable for one to wind up in the possession of British forces...
Assembly and Magnetising
As I mentioned above, much of the time spent assembling the miniature was actually in magnetising the turret, which I'm going to cover in a bit of detail because it turned out to be a bit more involved than I first thought.
First things first, tools required for the job are:
- A sharp hobby knife or scalpel
- Fine bladed hobby saw
- Hobby clippers
- A pin vice with 1mm and 2mm bits
- Modelling files
- Fine grit sanding paper/stick
- One or more 2mm x 2mm round magnets
- One 8mm x 1mm round magnet
- Superglue
Step One
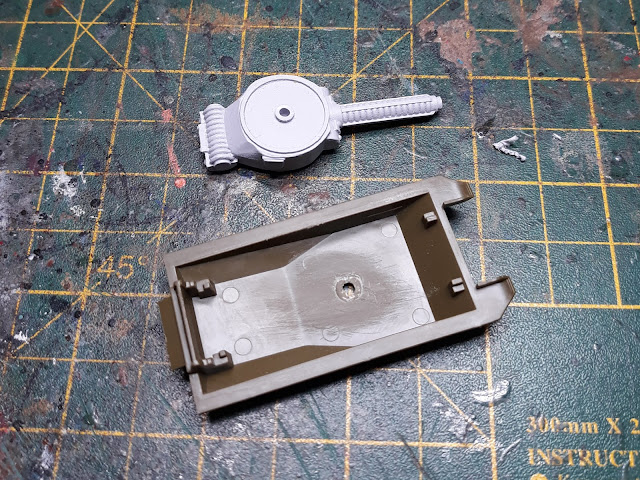
Remove the resin turret from the casting gate and clean up any flash or mould lines. I'd really recommend using a saw to remove the casting gate because using clippers can lead to damaging the bits you want to keep. Once you've done this, clip the top of the tank hull out of the plastic sprue and clean it up as well and you should have something that looks like this:
Step Two
It's important to tackle the hull first here, because then you'll know how much of the locator on the turret you need to remove for it to sit flush. So, using a combination of your clippers, knife and files and sandpaper, carefully remove the central plastic ring from the hull as well as the smaller disc on the underside to leave a flat surface - most of the top will be hidden by under the turret so don't worry if it's not perfect and the underside doesn't need to be neat either but the flatter you get it, the better you'll be able to glue the magnet in place when it's time.
Now you can sit the turret on top of the hull and measure how much of the locator lug you need to remove for the turret ring to sit flush on the top of the hull - from memory it's around 2-3mm but it's not much. Once you've got the turret sitting at the right height, you can use your pin vice to drill into the center locator lug. I'd recommend using your 1mm bit to make a shallow 'pilot hole' before going in with the 2mm bit to the depth you're happy with. Because I was going to use two 2mm x 2mm magnets, I drilled to a depth of about 4mm.
Once you've done both of these steps, you should have something that looks like this:
Step Three
This time around you can do either the turret or the hull first, it doesn't make much difference, just make sure to check, double check and then check again that you've got the polarity of your magnets correct!
For the hull, I glued the 8mm x 1mm magnet in place as you can see in the photos. You could almost certainly use a 5mm or 6mm magnet for this, but I had some surplus 8mm ones in my supply drawer, so opted for one of those.
 |
| Assembled and ready for priming. |
Painting
For the most part, the tank was painted in the same fashion as the Coyotes and Grizzlies, being primed grey, then basecoated and shaded. Layers and edge highlights were then added, before I got to work on the details. I decided early on that I wanted to lavish a little attention on was lenses of the head and tail lights as well the glass in the commander's periscope on the turret as I think the wee details like this can really add a sense of realism to miniatures, though painting lights that are so small wasn't the easiest task!
I also did a some research before I painted the stowage to to try and get the colour of the crate and the marking of the jerrycan looking 'right'. Cans used for storing water by British crews generally had white markings of some kind, the sources I found described the use of stripes and crosses for the most part, so I went with a simple vertical stripe as it's a pretty clear indicator even when you're in a hurry.
The mistake I'd made when shading the Grizzly actually paid dividends when it came to working on this project because it meant that I already had in mind that it glazing some of the large flat panels of the tank would be far more effective in creating colour modulation than just shading them, so I spent some time focussing on the glacis, sides and rear of the hull as well as the mantlet and sides of the turret.
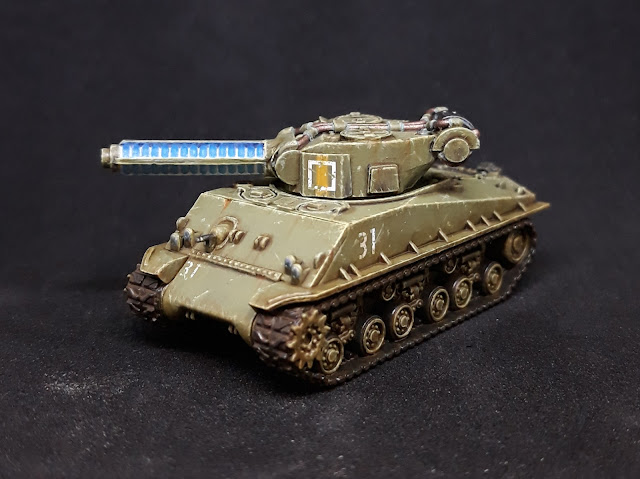
One of the more unique challenges for this project was what to do with the coils of the tesla cannon - I don't usually use object source lighting on my miniatures and I rarely paint magnetic coils glowing because I tend to think that if your containment coils are glowing then some kind of catastrophic failure is imminent, but sometimes you just have to go with the 'rule of cool'. The next question was how to go about painting glowy coils, but then I remembered seeing an awesome Easy Glow Tutorial by mostbergminis on Instagram which I adapted using paints I had and I have to say, although I wasn't sure about it initially, I'm really pleased with how it turned out.
I applied markings and numerals to in exactly the same way as on the walkers, but as I was bedding them in and adding the chips and scratches to the paintwork I decided to add some light rust streaking in a few select areas - I haven't done this on the walkers, but their claws have been chipped back to bare metal by use so I figure it balances out. One thing I did slightly differently when adding the markings was to add numerals to the front and rear nearside of the hull as I'd read that this was correct for British tanks towards the end of the Second World War - in my 'head canon' for the setting, walkers are sort of 'johnny-come-latelys' to the conflict so there simple aren't such clear guidelines for identification markings as there were for conventional armour.
The final step in the painting was to use Vallejo European Dust wash to dirty up the hull, running gear and tracks (which incidentally were just painted Vallejo Heavy Charcoal then drybrushed with Citadel Dark Reaper followed by Thunderhawk Blue before getting a heavy dose of Nuln Oil to create the look of them being rubberised - the tyres of the road wheels were painted in a similar fashion but with edge highlights rather than drybrushing.
I built up the dust over a few thin layers to try and give the impression that it had accumulated over time, perhaps being slightly washed or worn away in places so that it wasn't uniform in appearance.
Last, but by no means least '31' needed a pet name, and given her armament, 'Bolt From The Blue' seemed pretty apt:
And to finish off with, a wee 'family portrait' of my Konflikt '47 collection so far:
So that's it - one British Sherman M4A9E8(T) all done! I'm not sure what's next for the painting table, but part of me does want to see about making a base for the tank to match the walkers - that might be something for a wee mini project some time in the future perhaps...
Comments
Post a Comment