
"We are truth-speakers, we men of Gondor. We boast seldom, and then perform, or die in the attempt."
In a bit of a surprise turn of events, an additional Miniature of the Month has been squeezed into September to celebrate the launch of the Middle Earth Strategy Battle Game: Battle Osgiliath Set. So, grab your sword, don your armour and prepare to defend the White City with a Warrior of Minas Tirith!
Before we get started, a quick note just in case you haven't read the previous Miniature of the Month Masterclass, this isn't a full step by step tutorial, so rather than having photos of each and every stage of the process, there are only pictures of the finished miniature - but I do go through how everything was painted and all of the colours used are highlighted in bold.
To get best use out of the main guide, you'll need to have a little bit of painting knowledge already as it makes use of a couple of more advanced techniques, but as a quick note; glazing is using a diluted paint to apply a tint to an existing colour. Stippling is using the brush to apply paint in a 'stabbing' motion so as to create or accentuate texture.
If you're looking to get your Warriors of Minas Tirith painted and on the table as quickly as possible then skip to the end of this post as I've included a guide to painting them to Battle Ready as well so you can get gaming with them in no time.

For being originally released in 2003, the sculpts of many of the plastic Middle Earth miniatures stand up incredibly well, though unfortunately the casting quality isn't always fantastic so there will be mould lines to clean up - on the plus side, most of the Warriors of Minas Tirith require minimal assembly and the majority are cast in a single piece so they won't take long to get prepped at all. Once the model was cleaned up and glued into the slottabase, I glued some small pieces of slate to the base using superglue and then added a quick layer of texture paint, being careful to avoid covering the slate, or the miniature's feet.


There are loads of sources you can draw inspiration from when painting Middle Earth miniatures, from the box art and books produced by Games Workshop to footage and stills from the films like the ones below. For this mini I decided to use a combination of the two to get something that I liked the look of that was in also in keeping with the established aesthetic of the universe. As in the previous Masterclass article, I'll be go over how I painted each of the main areas of the miniature


Armour
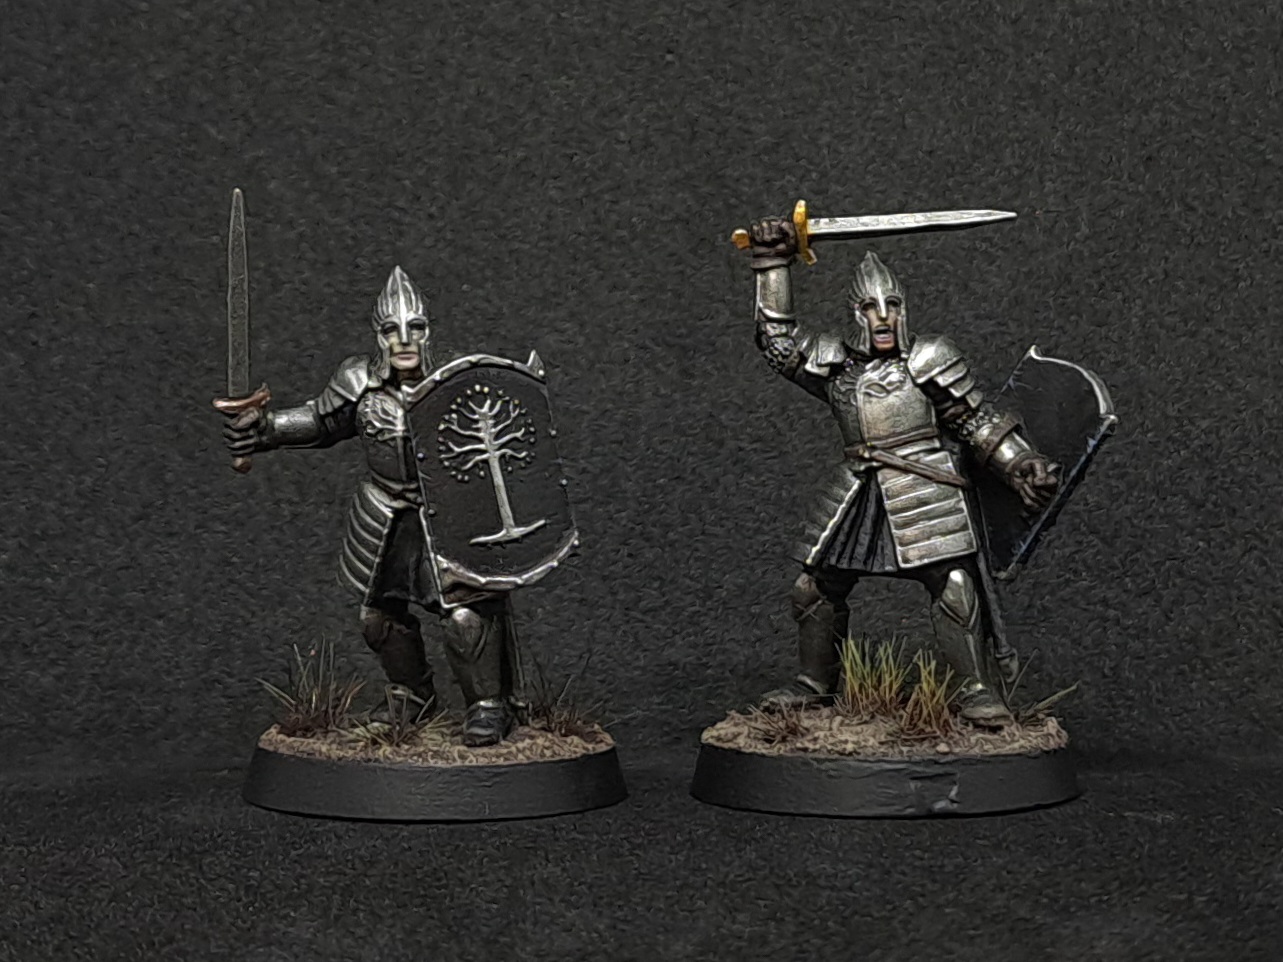
The well disciplined formations of Warriors of Minas Tirith take to the field of battle clad in distinctive heavy armour that is designed to afford them protection without inhibiting their capability to wield sword, spear and bow in the defence of Gondor and the White City.
To achieve a nice smooth, but not overly bright silver, I began by basecoating the armour plate, helmet and chainmail with Leadbelcher. Then apply a shade of Nuln Oil over them all being careful not to let it pool too much on the flatter areas of the plates as you don't want it to overpower the silver or to drown any of the details. Once this has dried properly, Leadbelcher was layered onto the armour plates and helmet to create some initial highlights. Ironbreaker was then used to refine these highlights, this was done with a combination of hitting the edges of the plates that catch the light, but also on the tops of the pauldrons and helmet which naturally reflect more light. Finally, extreme highlights were created with dots of Runfang Steel on some of the sharpest edges of the armour, such as the corners of the cheekguards and the point of the helm, and the corners of the pauldrons.
Sword
Though some might also be armed with spears or bows to increase their reach, no Warrior of Minas Tirith marches to war without a sword at his waist. The blade of the sword was basecoated Leadbelcher, then shaded with light layer of Nuln Oil. The edges were then picked out with Ironbreaker followed by some highlights of Runefang Steel towards the point of the blade.
To contrast the blade, the hilt and pommel were both basecoated with Balthasar Gold and then received a shade of Agrax Earthshade. They were then layered with Hashut Copper and Runefang Steel was applied as an extreme edge highlight.

Shield
The shield was basecoated with Abaddon Black before all of the edges of the black area were highlighted with Dark Reaper. You can just do the 'hard' edges at the sides of the shield, but I wanted to place some highlights at the top and bottom as well so as to create a little more the contrast on a subsequent step. These initial highlights were refined with Thunderhawk Blue. With these in place, thin some Rhinox Hide down to roughly the consistency of milk and carefully paint it into the recesses where the trim meets the face of the shield, as well as around the rivets - this is where the Dark Reaper highlights at the top and bottom of the shield come into play as they help to create a little more definition between the black on the shield face and the silver of the trim.
Once the Rhinox Hide has dried, pick out the rivets and some of the fresher scratches on the edges of the shield with Fenrisian Grey.
The face of the shield is dominated by a stylised rendition of the White Tree of Gondor, a symbol of the kingdom which has stood in the Fountain Court in the city of Minas Tirth for centuries. As white and silver are interchangeable heraldic colours, I opted to paint the tree and the trim of the shield silver as this feels more in keeping with the colours seen on the shields in the movies. The tree and the trim were both basecoated with Leadbelcher and then shaded with Nuln Oil. Once the shade was completely dry, Leadbelcher carefully layered back onto both the trim and the tree - on the trim you want to focus on the edges and areas between the rivets, while on the tree you want to try and hit the outer edges of the trunk and the upper branches.
Then using some thinned Ironbreaker, you can pick out the edges of the tree and the trim. By thinning the paint down, you can add additional layers to the edges you want to be brighter and thus catch the light more such as the upper edges and rivets on the trim and the tops of the branches and roots of the tree. To finish the silver details of the shield off, the areas that catch the most light received an extreme highlight of Runefang Steel.
Leather
Although boxart and movie stills show the men of Gondor using only black leather, I decided to go with an oiled brown for the sword belt, scabbard and glove(s) instead so as to add a little more visual interest to the miniature because between the large areas of silver and black it was looking bit too monochromatic.
The oiled brown started with a basecoat of Dryad Bark which was then shaded first with Agrax Earthshade to create some definition and then with Nuln Oil to create a nice, rich, 'oiled' leather tone. Dryad Bark was then roughly layered onto the glove and scabbard to start to create some texture to give them a slightly worn look. Gorthor Brown was then used for some initial highlights as well as to add some scrapes and scratches which were then refined with some thinned Baneblade Brown.

Hair and Skin
Well armoured as they are, there isn't a lot the Warrior's skin that is visible and much of his hair is hidden by his helmet. Nevertheless, the face in particular is a focal point for the miniature, so a little attention will go a long way. The hair was first basecoated with Thondia Brown before being shaded with Agrax Earthshade. Thondia Brown was then reapplied to strands of hair so as to leave the Agrax visible in the recess. Next, some thinned Mournfang Brown was placed onto the more prominent areas of the hair and to finish things of dots of Skrag Brown were placed at the tips to accentuate them a little more.
To create the pale complexion sported by this particular Warrior, I started with a basecoat of Rakarth Flesh, I thinned the paint a with a little water and applied a couple of thin layers to get a smooth finish on this. The face was then shaded with Agrax Earthshade - this wasn't a heavy wash, but a carefully applied shade so that the details weren't overwelmed. Once the shade had fully dried, I reapplied Rakarth Flesh to the cheekbones, chin and lips as well as the sides of the nose before layering them with Flayed One Flesh. I added a touch of Pallid Wych Flesh to the chin to add a little more definition as the Warrior's is looking slightly upwards so it catches the light a little more.
To finish things off, I glazed the lower lip with a mix of Flayed One Flesh and Carroberg Crimson, then glazed the Warriors' eye sockets with a mix of Flayed One Flesh and Drakenhof Nightshade before finally using Nuln Oil to glaze the eyes themselves.

Fabric and Boots
Basecoat the fabric with Abaddon Black, then you can begin to sketch in some texture to create highlights on the edges and folds using some thinned Skavenblight Dinge. Next use Eshin Grey to begin to refine the highlights - try and stay within the previous layer if possible, though you can add some scrapes and scuffs if you want to. Further refine the highlights using Dawnstone, focusing on the sharpest edges of the folds before finishing up by adding small dots of Adminstratum Grey to the points where the highlights intersect, like at the hemline of the gambeson. The trousers and boots were painted using exactly the same colours, though the highlights were kept more muted on the trousers and the boots were painted to look a little scuffed in places to give the impression they're quite well worn.
Base
The base was painted Dryad Bark, then drybrushed with Gorthor Brown, taking care to try and avoid the miniature's feet. This was followed by a drybrush of Baneblade Brown which then received a light drybrush with Karak Stone.
With the soil done, I set about painting the rocks, beginning with a layer Dawnstone before shading them Agrax Earthshade. Once the shade has fully dried, thin some Dawnstone and start to sketch in some texture using thin lines, paying particular attention to the edges of the rocks as well as any large, flat areas. With this layer established we can start to add some highlights to the edges of the rocks with Administratum Grey. Celestra Grey was used to refine highlights a little further and finally some dots of Ulthuan Grey were placed on some of the sharpest edges as an extreme highlight. To add a little more realism, you can create the appearance of algae/moss growing on the rocks by adding Athonian Camoshade to some areas.
To complete the base, I used some scorched grass tufts that were 'bedded in' by using a stiff bristled brush to 'push' some thinned Dryad Bark between the strands of grass and then painted the rim with a couple of thinned layers of Abaddon Black


Battle Ready
If you want to get your Warrior of Minas Tirith 'Battle Ready' then follow these quick steps:
Paint the fabric, boots and shield Abaddon Black.
Next paint the armour plate, sword blade and details on the shield Leadbelcher,
Then paint the leather straps, sword scabbard and glove(s) with Dryad Bark
Paint the hilt and pommel of the sword Balthasar Gold, the hair Thondia Brown and the face Rakarth Flesh.
Finally carefully apply a texture paint of your choice to the base - Stirland Battlemire or Agrellan Earth will work well and provide a nice contrast to the minature. For more info on Citadel texture paints, check out this this handy guide.
With these basecoats in place, the next 2 steps will add contrast to the miniature and help to define the details. First, carefully shade the leather, sword hilt and pommel, face and hair with Agrax Earthshade. Once this has dried fully, shade the armour, sword blade, shield details and leather details with Nuln Oil. Leave this shade to dry and then paint the rim of the base with Abbadon Black and your warrior will be ready to take to the field to fight the enemies of Gondor.
If you're painting a whole unit, you could mix things up by using other colours for the hair - Rhinox Hide, Mournfang Brown and Dryad Bark would work well, though you could also go with Skavenblight Dinge, or even Steel Legion Drab or Zandri Dust if you wanted a lighter hair colour.
You could also substitute Bugman's Glow, Cadian Flesh or Kislev Flesh for Rakarth Flesh for a less pallid skin tone, though if you do, you'll get a better result by shading them with Reikland Fleshshade.

Comments
Post a Comment