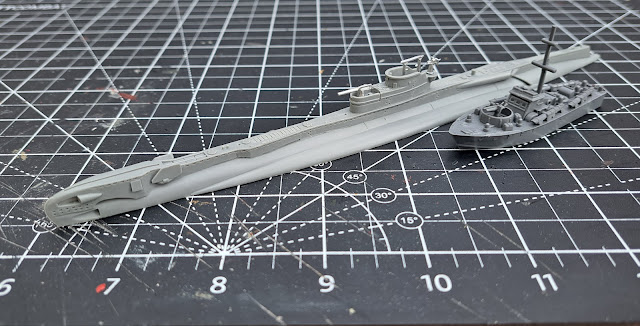
The kit arrived packaged up for retail display and comprised a resin hull along with white metal QF 4 inch deck gun, periscope tubes and what I think is a 20mm Oelikon AA gun. Also included are a ship card, damage trackers and a wake marker.
Cast quality on the resin hull was exceptional with just a couple of tiny areas of flash requiring clean up with a sanding sponge once it had been given a soak and scrub in some warm soapy water.
The metal components needed a bit more work with a file to remove mould lines, but this was no more than I’d expect with white metal parts.
Once I was happy with everything, I set about dry fitting the components together and other than needing a pin-vice to slightly deepen the locator holes for the periscope tubes, assembly took only a handful of minutes to complete. One note of caution, while the barrel of the deck gun is pretty sturdy, the Oerlikon is so fine that it bends very easily so if you’ve giant sausage fingers like me you’ll need to make sure you don’t accidentally catch it when handling the model.
The subs' hull is about 18.5cm or 7.4" in length, or to put it another way, about 3 Vospers long. Placing it alongside a plastic type II Vosper from my pile of opportunity, gives a better sense of how big it is though.
When it came to painting, I was initially a wee bit stumped despite some preparatory research as there are a bewildering array of paint ranges available now. Rather than scrabble around blindly, I dropped Warlord Games customer services an email and they were able to speak with the studio team about how the box art model had been painted. Their recommendation was to use Army Painter Fanatic Turquoise Siren for the upper hull and Vallejo Model Colour 990 Light Grey for the lower hull and details – these might be a bit too bright to be truly historically accurate, but as I wanted to emulate the box art paint job this was really helpful.
As with most of my painting projects these days, I undercoated the kit with Humbrol Grey Primer #1 as I find that not only does it give a really good finish that pretty much everything I’ve painted over it sticks to, but it also helps me being able to see what I’m doing.
With the model primed, I set about basecoating with Turquoise Siren and Light Grey before using some Vallejo Oiled Earth wash to help pick out the details and recesses of the hull. Once I was happy with this, I sketched some of the Turquoise and Grey back over areas where I’d been a bit heavy handed with the wash before using Vallejo Sky Grey 989 followed by a little Off-White 820 to highlight the grey areas and Army Painter Fanatic Aquamarine for the upper hull.
With this done it was time for the fun part, adding rust and grime to make the sub look like it’s been out on patrol rather than being fresh out of dry dock. I used a combination of Vallejo Rust 506 and Dark Rust 507 washes first to paint rust streaks and and spots, taking the time to build them so that some areas were more heavily streaked than others while also trying not to go over the top as I didn’t want the sub to look decrepit!
Once I was happy with the rust and I’d let it all dry overnight, I went back to the model with some Vallejo European Dust 523 wash and used it to add some streaks of grime to the lower hull as well as a little dirt to a few areas on the deck where water might accumulate after surfacing and with that, I was all done.
Overall, I’d say I’m very happy with the kit. Although the price point might feel a little high for some folk due to it not comprising very many components, for a handmade gaming piece I think it’s fairly reasonable and between the quality of the components and it providing me with a couple of evenings’ entertainment while painting it up, I certainly feel as though I’ve got good value from my purchase.
I hope this write up is helpful, I very much enjoyed working on this project and may get some more Cruel Seas stuff on the painting table soon. Until next time though, thanks for reading and happy hobbying.


Comments
Post a Comment