

The Miniature of the Month for May is an Adeptus Arbites Vigilant and I couldn't resist giving one the Masterclass treatment as the miniatures are absolutely fantastic, combining elements of older iterations of the Arbites with modern Warhammer 40,000 aesthetics and taking full advantage of modern design and production methods to make an incredibly detailed and very characterful kit.
To get best use out of this guide, you'll need to have a little bit of painting knowledge already as it makes use of a couple of more advanced techniques, but as a quick note; glazing is using a diluted paint to apply a tint to an existing colour. Stippling is using the brush to apply paint in a 'stabbing' motion so as to create or accentuate texture and feathering is using the same brush as you've just applied paint to the miniature with—without reloading paint—to drag the paint out and over the existing colour. This spreads the new paint, thinning it and blending it in with the rest of the area.

To you falls the solemn duty of enforcing the Lex Imperialis, foremost among the Laws codified by the most glorious and benevolent God-Emperor of Mankind at the dawn of the Imperium.
In discharging your duty, you shall not concern yourself with such petty transgressions as murder or theft, for these are the responsibility of municipal enforcers of local governors. Instead, you shall be the mailed fist that ensures the survival of mankind in perpetuity, preserving that which has endured for ten thousand years until the very death of the stars.
From this day until the moment of your death, you shall go forth without fear or favour and unto those who threaten the Imperium from without and within you will bring the Emperor's justice.
To those who sabotage production quotas or trade without concern for the Emperor's due, you will bring justice.
To those who traffic with xenos or misappropriate Imperial subjects from their rightful duties, you will bring justice.
To those who seek to evade or avoid their rightful responsibilities to the eternal Master of Mankind, you will bring justice...
exc. Liber Imperialis Inlatio
(m.39 revised edition)
Assembly
Like the Rotmire Creed Mirefolk Outcast, Leagues of Votann Hearthkyn Cadian Shock Trooper and Jade Obelisk Defacer the miniature of the month available from Warhammer stores comes on a single sprue and is supplied with a 28mm round base. To build the mini, it's just case of assembling the parts in the numerical order that they're labelled on the sprue.

If you’re using one of the miniatures from the Adeptus Arbites Exaction Squad kit like I have though, you'll find that most have two build options, so you'll need to choose which one you want to assemble. In some cases, these options are purely cosmetic, but some have special weapons or wargear such as shock mauls and supression shields or heavy stubbers, webbers and meltaguns.
I've opted for a helmeted Arbites Vigilant advancing with their combat shotgun held at ease as I think the pose really embodies the menace of these sinister agents of Imperial justice.

In a change from my usual approach to basing, I decided to have a wee go at something different and more suited to the environments Arbites might typically be seen operating in. On this basis, before I glued the miniature to the base, I filed the embossed texture on top of the base down a little to create a smoother surface and then added a couple of patches of texture paint which will serve as dirt/debris or corrosion.
The final stage of preparation was to prime the miniature was undercoated with a grey spray primer.
Painting
In painting the Vigilant, I've drawn inspiration from the Warhammer Studio paint scheme for the Arbites miniatures. Although I haven't used all that many colours across the model, some of them have quite a few steps involved in achieving the final look, so I've divided the rest of this guide into four sections so that it's a bit less unwieldy: Uniform, Wargear, Details and finally, the Base.
I've also included a short Battle Ready Painting Guide at the end, so if you're looking to get your agents of Imperial Law painted up and on the table as quickly as possible, then feel free to skip to the bottom of the page to check it out.
Uniform
Bodyglove
Arbites uniforms consist of a combination of rigid armour plates worn over bodygloves woven from impact-resistant micro fibres. To make the two visually distinct from one another, I decided to paint the bodyglove in a dark grey tone, so I began by basecoating the bodyglove with Skavenblight Dinge. Once I had a nice smooth base layer, I shaded it twice with Nuln Oil, making sure to let the first shade dry completely before applying the second one to avoid lifting any of the paint off of the miniature. With the fabric nicely darkened down, I layered some thinned Skavenblight Dinge onto the raised areas and folds, before using Stormvermin Fur to apply some initial highlights. Once I was happy with these, I used some thinned Dawnstone to refine the highlights.

Carapace Armour
The black carapace armour of the Vigilant started out with a basecoat of Abaddon Black, I thinned the paint with a little water and used about 3-4 thin layers to get a nice smooth finish. With the base layer established, I then set about beginning to add some definition to the armour - you could easily skip this step, but I feel that it's worth doing as it creates more visual interest and helps to create a less harsh transition from the basecoat to highlights.

To begin with, I thinned down some Rhinox Hide with water and carefully painted it into the recesses of the armour plates as well as around the rivets - this isn't a wash, but a controlled application of the paint, so you want to thin it to about the consistency of milk. Once this had dried, I thinned some Doombull Brown in the same way and repeated the process, but this time tried to keep the Doombull Brown 'inside' the Rhinox Hide. If you make any mistakes with these shades, you can easily tidy things up with a little thinned Abaddon Black and a small brush.
Once I was happy with the shading, I turned to highlighting and started out by picking out all of the edges of the armour and helmet with Dark Reaper. From here, I used Thunderhawk Blue to apply an extreme highlight to the most prominent edges of the armour to help accentuate where they naturally catch the light. To finish up, I used a little Fenrisian Grey to pick out all of the rivets before adding some very small dots to the sharp corners of the armour plates.

Leather straps, pouches and holster
The dark tan leather of Vigilant's sidearm holster and belt pouches, as well as the fastening straps of their carapace armour began with a basecoat of Thondia Brown which I shaded with Nuln Oil. I then used Doombull Brown to pick out all of the edges of the leather, as well as addinf a few scuffs and scratches. Once I was happy with how this was looking, I used Skrag Brown as an extreme highlight, focusing on the corners of the pouches and holster the very edges of the straps as well as refining the scuffs on them both.

Boots
Although the boots that the Vigilant is wearing are also painted black, I wanted to painte them slightly differently to the carapace armour as I figured they would be made of some form of leather or syn-leather rather than the composite materials that the armour would be constructed from. To achieve this difference in tone, I started with a basecoat of Abaddon Black before highlighting all of the edges and creases in the boots with Eshin Grey. I then made a 50:50 mix of Eshin Grey and Dawnstone and used this to refine the initial highlights, focussing on the areas I wanted to be catching more light, like the toe caps and the treads of the raised left boot.
Wargear
Combat Shotgun
One of the Arbites signature weapons, their combat shotguns are rightly feared by Imperial citizens and outcasts alike and often just the sight of one is enough to quell any thoughts of resistance from their quarry. As such, the shotgun is visually distinct enough from the miniature to stand out, while still fitting with the overall tone of the colour scheme.

The casing of the shotgun began with a basecoat of Khorne Red which was shaded with Nuln Oil three times, ensuring that the preceding shade was completely dry before applying the next so as not to lift paint away from the model as it was drying.
Note: - A more effective way of doing this might have been to make a mix of Khorne Red and Abaddon Black and painting it onto the basecoat, but I'd already started with the shades of Nuln Oil before I thought about this, proof that it pays to be mindful of what you're doing when you're painting!
Once the casing had been shaded down, I then applied a 'chunky' highlight to all of the edges with Khorne Red which was then refined with a thinner highlight of Wazdakka Red which was mainly focused on the upper edges of the gun casing. To finish off, I used some thinned Squig Orange to pick out the rivets and coners and make them 'pop'.
The working parts of the shotgun as well as the muzzle and pistol grip were basecoated with Leadbelcher before being shaded with Nuln Oil and then highlighted with Ironbreaker.
The armourial eagles on the shotgun casing were basecoated with Retributor Armour before being shaded with Agrax Earthshade. Once this was dry, I used Liberator Gold to highlight all of the edges up before using a more controlled highlight of Stormhost Silver to pick out the corners of decoration.
Grenade
I'm not sure what Krak Grenades have to do with collecting tithes, but the Vigilant has one on his belt - presumably just in case a recalcitrant Planetary Governor refuses to open a safe or something? In any case, I decided to paint it up to look suitably utilitarian in appearance and started out by basecoating the casing with Death Guard Green - this base paint is quite translucent, so it's best to do about 2-3 thinned layers rather than trying to go for 1 thick one. After shading the casing with Agrax Earthshade, I then layered it with Death Guard Green before applying an initial highlight to the seam and upper and lower edges of the surface with Elysian Green. Once I was happy with this I used some Ogryn Camo to refine the highlights, concentrating more on the upper edges which would catch more light.

Comms pack, Magnacles and Repression baton
The gunmetal part of the comms pack on the Vigilants back, along with the Magnacles and Repression Baton on their belt were basecoated with Leadbelcher before being shaded with Nuln Oil and then highlighted with Ironbreaker. For the baton, I also used Ironbreaker to paint some scratches and scuffs along the shaft to add the suggestion that it's seen a little use by the Vigilant. The grip of the baton was painted in the same way as the leather of the belt and armour straps described above.
The cables connecting the comms pack and the stab light on the chest were picked out with Mephiston Red before being shaded with Agrax Earthshade. I then layered them with Mephiston Red before applying a highlight of Evil Sunz Scarlet and then a controlled, extreme highlight of Wild Rider Red which was mainly focused upon the where the cables meet the black or metallic areas of the miniature.

To finish up, the wee indicator lights to the right of the switch on the comms pack were picked out with Caliban Green before I carefully painted a little Nuln Oil around them to help define them from the gunmetal. I then tidied up the lights with Caliban Green and then highlighted them with Warpstone Glow, and a tiny bit of Moot Green.
Details
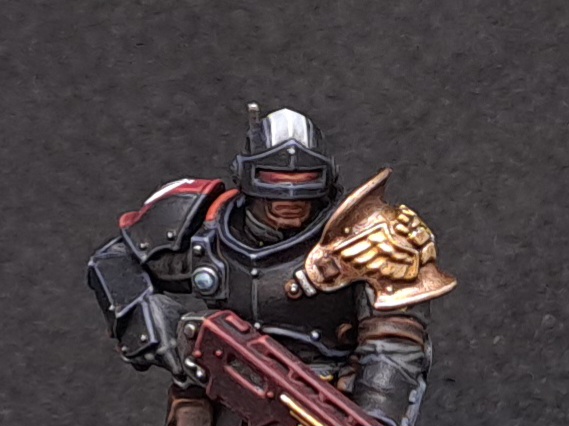
Right Pauldron
Presumably drawing inspiration from the highly stylised armour of a famous fictional Judge whose name rhymes with 'Bread', officers of the Arbites have always borne an embellished right shoulder plate and the newer versions are no exception, though it at least looks like functional armour now.

The brass of the shoulder plate was basecoated with Balthasar Gold before being shaded with Agrax Earthshade Once this was dry I carefully feathered Hashut Copper onto the areas of the plate that caught the most light before picking out the edges with Ironbreaker.
I had initially thought I'd paint the crest on the shoulder in the same way, but I found it blended into the background a bit too much, so in an effort to make it more distinct from the armour plate I went back and repainted it in the same way as the armourials on the casing of the shotgun.
The cables connecting the comms pack and the stab light on the chest were picked out with Mephiston Red before being shaded with Agrax Earthshade. I then layered them with Mephiston Red before applying a highlight of Evil Sunz Scarlet and then a controlled, extreme highlight of Wild Rider Red which was mainly focused upon the where the cables meet the black or metallic areas of the miniature.
Lights and Lenses
The lens of the stab light on the Vigilant's chest plate was basecoated with Russ Grey before being shaded with Coelia Greenshade. Once the shade had dried, I reapplied a layer of Russ Grey to the upper right two thirds of the lens, then applied a finer layer of Fenrisian Grey, further into the upper right of the lens. Once this was done, I thinned some Pallid Wych Flesh with a little water and used it to apply a highlight the top right of the lense and to place a wee dot in the bottom left to create the impression of light reflecting through it.
To help tie everything together and smooth the transitions between the layers, I thinned some Coelia Greenshade with Lahmian Medium and used it to paint a glaze over the whole stab light before carefully pickiing out the ring around the glass with Leadbelcher and then highlighting the upper portion of it with Ironbreaker.
To get a suitably sinister red for the reflective visor of the Vigilant's helmet, I started out with a basecoat of Khorne Red which I shaded with Nuln Oil. I then carefully reapplied a thin layer of Khorne Red, ensuring the shaded red remained at the edges of the armour glass. I then applied a thin layer of Wazzdakka Red focusing it towards the top and middle of the visor before repeating the process with Squig Orange then Jokaero Orange and finally Kislev Flesh focusing more towards the top centre each time.
To help tie the layers of colour together I painted a glaze of thinned Carroberg Crimson onto the whole visor which I followed up with a glaze of thinned Nuln Oil applied directly into the corners of the armour glass to darken them down a little.
Flesh
There's very little of the Vigilator's skin exposed as they're almost completely enclosed within their armour, but their mouth remains visible below the visor of their helmet. Despite this, the face is still a natural focal point of the miniature, so I've taken the same approach to painting the Vigilant's mouth just as I would have if the model was completely bareheaded.
I started out by basecoating the area with Cadian Fleshtone which I shaded with Reikland Flesh Shade. Once this was dry, I carefully reapplied a layer of Cadian Fleshtone, leaving the shade showing in the recesses. I then added a very fine highlight of Kislev Flesh to the Vigilant's philtrum and lower lip. The lower lip was then glazed with a roughly 50:50 mix of Kislev Flesh and Carroberg Crimson.
Markings
Although they're not bedecked with anywhere near as much heraldry as a Space Marine the officers of the Adeptus Arbites still bear some identifying markings, especially when gathered into Exaction Squads.

I started out the red stripe on the Vigilant's left pauldron by painting two thin parallel lines of Khorne Red onto the black. Once I was happy with the placement of these 'borders' I then filled the stripe in and tidied up a couple of wee slips with Abaddon Black.
From here I shaded the red with Agrax Earthshade and then once the shade was dry, thinned some Khorne Red with water and feathered it onto the upper portion of the stripe as well as onto the upper and lower rims of the shoulder pad, leaving the shaded red showing in the recesses. As soon as I was happy with how this was looking I repeated the process with Wazzdakka Red. To finish the stripe off, I used Squig Orange to apply a highlight where the red meets upper and lower edges of the shoulder pad.
The white 'Φ' marking is a transfer taken from the Adeptus Arbites decal sheet used to denote members of Exaction Squads. After applying gloss varnish to the shoulder pad, I carefully cut the decalsfrom the sheet and applied them using tweezers and a small paintbrush to slide them into place before dabbing them dry with a clean cotton bud.
I applied some Microsol to the decal to soften it and help it sit more naturally on the curved surface e and left everything to settle and cure overnight. The following day, I applied a layer of gloss varnish over the decal to seal it and help hide the gloss of the backing paper before using matt varnish to dull down the sheen of the gloss varnish.
I applied some Microsol to the decal to soften it and help it sit more naturally on the curved surface e and left everything to settle and cure overnight. The following day, I applied a layer of gloss varnish over the decal to seal it and help hide the gloss of the backing paper before using matt varnish to dull down the sheen of the gloss varnish.
The distinctive white stripe running across the top of the Vigilant's helmet started out with a basecoat of Celstra Grey which I shaded using Agrax Earthshade. Once this was fully dry, I feathered thinned Celestra Grey onto the stripe, focusing most of my attention on the uppermost portion of the helmet as well as on the edges of the stripe to help deliniate them. This takes a few thin layers to build up a smooth transition, so try not to rush and add too much paint at a time.
I then repeated the same process using Ulthuan Grey but applying the paint more selectively towards the top and very edges where the stripe would naturally be brighter. To complete the stripe, I thinned some White Scar so it would flow more smoothly and applied an extreme highlight to edges and the ridge in the centre.
Base
Because the Arbites are not 'frontline' operatives, I decided to go with a different style of basing for the Vigilant that's more reflective of the kinds of environments that the Arbites would be likely to operate in such as civic buildings, hive habs or possibly even voidcraft .

With this in mind, I began by basecoating the flat area of the base with a few thinned layers of Mechanicus Standard Grey. Once this was dry I applied a coat of gloss to the base and added a stencilled text decal taken from the Necromunda Propaganda Transfer Sheet. With the decal in place, I used some sponge to apply scuffs and chips to the white text with Mechanicus Standard Grey to create the impression that the paint has begun to wear away from the floor. I also sponged a little Rhinox Hide across the the whole surface of the base to add some more texture to the surface - less is more with this kind of thing as it's very easy to overwhelm a miniature with weathering.
Once I was happy with how everything was looking, I highlighted the edges of some of the sponged chipping using Dawnstone to give them the impression of being more three dimensional (a painting technique known as trompe l'oeil, French for 'optical illusion'). With all of the weathering in place on the base, I applied a couple of coats of gloss varnish to seal the decal in - the reason for doing the weathering before doing this is that gloss varnish darkens things down a little which can create a noticeable tonal dissonance that's a bit jarring - before turning to the 'debris' patches.
To contrast with the grey rockrete/deckplate, I painted the debris in a warm brown. Starting with a basecoat of Mournfang Brown, I then drybrushed the debris with Balor Brown followed with a lighter drybrush of Hobgrot Hide. To tie everything together, I thinned down some Balor Brown to make a glaze which I applied patchily across the whole base - when this dries it creates a nice filter to the colours beneath, giving them a slightly dusty/grimy look.
To finish the base off, I painted the rim with Abaddon Black and the Vigilant was ready to take to the tabletop!
Battle Ready Guide
If you're looking to get your Arbites battle ready and on the table as quickly as possible, then you can follow these quick steps:
- Paint the bodyglove Skavenblight Dinge
- Paint the armour plates, boots and helmet Abaddon Black
- Paint the stripe on the helmet Celestra Grey
- Paint the belt and any pouches Thondia Brown
- Paint the working parts of the combat shotgun, magnacles and baton Leadbelcher
- Paint the shotgun casing, helmet visor, cables on the armour and the lamp on the chest Khorne Red
- Paint any exposed skin on the head either Rakarth Flesh, Bloodreaver Flesh or Cadian Fleshtone
- Paint the base Mechanicus Standard Grey, then apply a few small patches of a texture paint like Stirland Mud, Astrogranite Debris or Agrellan Badlands to the base
- Shade the whole model, including the base with Nuln Oil.
- Paint the base rim with either Abaddon Black or Steel Legion Drab
- (Optional) Carefully apply an Exaction Squad transfer to the right shoulder pad
If you're assembling a full Kill Team of Arbites, then you can map the above colours across the whole squad fairly easily, perfect for if you want to get a squad painted up to a good basic standard quite quickly and of course you could always go back and add some highlights and extra details to the miniatures at a later date if you want to.

Whether you end up drawing inspiration from the Masterclass or the Battle Ready Guide, I hope you find them useful and if you give either of them a try, whether its painting your own Arbites, or adapting the scheme to other miniatures, I'd love to hear how you get on. Until next time though, thanks for reading and happy hobbying.
Comments
Post a Comment