

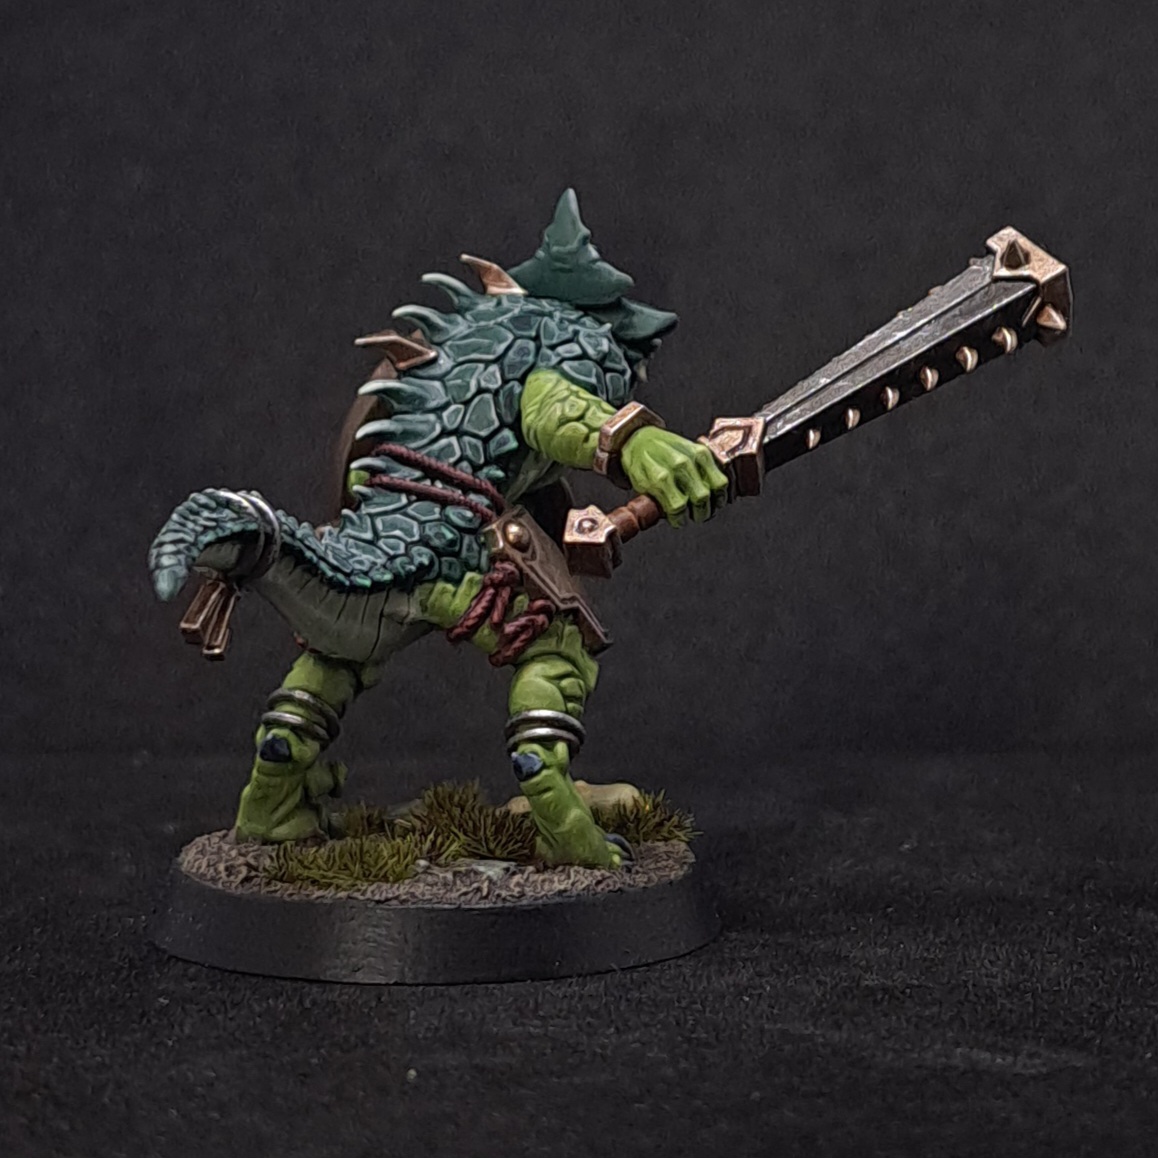
The first of June's Miniature of the Month is one of the fantastic new Saurus Warriors that have been released as part of the Seraphon range refresh for Age of Sigmar. Having painted a Skink back in December I was pretty excited to get my hands on one of their bigger, meaner brothers to unleash my brushes on.
Before we embark upon the quest to enact the Great Plan of the Old Ones, I'll just mention that as with my other Miniature of the Month Masterclasses, this isn't a step by step tutorial. Rather than having photos of each and every stage of the process, there are only pictures of the finished miniature; although I try and plan out painting projects in advance of picking up brushes, there can be quite a lot of jumping between the various elements of the miniature to build things up so it's a bit tricky doing a full step by step guide. However, I will go through how everything on the miniature was painted in detail and all of the colours used are highlighted in bold.
To get best use out of this guide, you'll need to have a little bit of painting knowledge already as it makes use of a couple of more advanced techniques, but as a quick note; glazing is using a diluted paint to apply a tint to an existing colour. Stippling is using the brush to apply paint in a 'stabbing' motion so as to create or accentuate texture and feathering is using the same brush as you've just applied paint to the miniature with—without reloading paint—to drag the paint out and over the existing colour. This spreads the new paint, thinning it and blending it in with the rest of the area.

Larger than their Skink cousins and bred solely for war, Saurus are the brutal beating heart of many of the armies and have been witnessed within the ranks of both the 'coalesced' and 'star-borne' Seraphon alike.
Saurus Warriors are most commonly seen advancing across the battlefield in disciplined cohorts, their cold-blooded savagery remains concealed until battle commences. Once given the command however, they become fearsome threshers of savage jaws, celestite weaponry and single-minded focus.
Others have been observed taking to the field of war astride bipedal predatory beasts known Aggradons. Wielding dazzling lances, these warriors are akin to the knights of other races, fulfilling the roles of heavy cavalry and shock troops as they crash into the enemy in an unstoppable tide of teeth and claws.
Created by the Old Ones more for brawn than brains, it is rare for Saurus to attain positions of rank or power within Seraphon society. Nevertheless, some rise to become champions known as Scar-Veterans, marked for command by a combination of battle-tested skill and sheer ferocity.
The Enigmatic Seraphon: Observations of the Saurus
Cucius Brahn
Assembly
Like the Rotmire Creed Mirefolk Outcast, Leagues of Votann Hearthkyn, Cadian Shock Trooper, Jade Obelisk Defacer and Adeptus Arbites Vigilant, the miniature of the month available from Warhammer stores comes on a single sprue and is supplied with a 32mm round base. Assembling the mini is simply case of assembling the parts in the numerical order that they're labelled on the sprue - be sure to dryfit them before you apply any glue to check how they go together.

If you’re using one of the miniatures from the Saurus Warriors kit, you'll find that they have two weapon options, so you'll need to choose whether you want to arm you Saurus with a Celestite Club or Spear. One thing to watch whichever version of the Saurus you're building is to be careful not to squeeze the front of the torso out from between the two halves of the body when you're gluing them together, it's fairly easy to do this unintentionally and the last thing you want is to be scrabbling about trying to find where the front of the miniature has pinged off to!


Once the model was glued to the base, I added an Orruk skull from the Citadel Skulls kit as well as a few small bits of slate as rocks before applying texture paint around everything.
Painting
In painting the Saurus, I drew inspiration from one of the colours schemes that was shown off when the Seraphon line was previewed at Warhammerfest a few months ago - though for reasons I can't explain, there are also hints of some amphibious characters from a late 80's cartoon in there as well! To help make the Masterclass a bit easier to follow, I've divided the rest of it into four sections so that it's a bit less unwieldy: Scales and Skin, Armour and Weapons, Details and finally, the Base.
I've also included a short Battle Ready Painting Guide at the end, so if you're looking to get your Saurus Warriors painted up and on the table as quickly as possible, then feel free to skip to the bottom of the page to check it out.
Scales and Skin
The scales and skin consist of four different areas each of which are green in tone while contrasting with one another - Saurus aren't subtle creatures and I wanted to try and convey this using the combination of colours almost like threat markings - whatever is facing down this Saurus is going to know that it's not going to have a good day!

Underbelly
The pale underbelly was basecoated with Ionrach Skin and then shaded with Kroak Green. I haven't used this shade before, so this was something of an experiment, but the subtler green worked perfectly for what I wanted here. Once the shade was dry, I thinned some Ionrach Skin and layered the underbelly area back up being sure to leave the shade showing in the recesses of the musculature. Once I was happy with how this was looking, I moved on adding some highlights - beginning by feathering thinned Deepkin Flesh onto the most prominent areas of the muscles, as well as using it to pick out the edges of the folds of the skin and the collar bones. I repeated this step a few times, refining the placement of the Deepkin Flesh each time to help create a smoother transition between the laters. To finish things off, I used Pallid Wych Flesh to add some extreme highlights to the folds of skin on the chest and tail as well as the abdominal muscles that catch the most light.

Arms and Legs
The pale green of the Saurus' limbs was basecoated with Orruk Flesh before being shaded with Kroak Green. Once this was fully dry I went back with thinned Orruk Flesh and layered up the skin as well as the scales on the calves and forearms. With the skin tone now set, I used Ogryn Camo to feather in some initial highlights, picking out the muscles as well as the edges of the scales. Finally I used Krieg Khaki to refine the previous highlights.
Lighter Green Scales and Spines
The lighter, almost turquoise scales that make up most of the Saurus' natural armour were basecoated with Sons of Horus Green - this is another new addition to my paint collection and I love the bluer tone of the colour, and this seemed like the ideal project to try it out on. As it's a layer paint, it took a couple of thinned layers to get a good smooth basecoat but once it was in place I shaded it with Coelia Greenshade. From here, I picked out the edges and ridges of all of the scales dorsal spines using Sons of Horus Green before repeating the process with thinned Deepkin Flesh. Once these initial highlights were in place, I then went back with thinned Deepkin Flesh and brightened up some of the edges a little more by adding further layers until I was happy with how it looked.
For the tips of the dorsal spines, I layered up with the Sons of Horus Green and Deepkin Flesh as described above - adding a wee dot of Deepkin Flesh to the very end of each of the spines. I then thinned down some Sons of Horus Green to make a glaze and used it to smooth the transition between the two colours out a bit.

Darker Green Scales
The line of darker lateral scales started with a basecoat of Incubi Darkness which I shaded with Coelia Greenshade followed by Nuln Oil to darken them down a little further. I then added a thinned layer of Incubi Darkness back on to them before picking out all of the edges with Kabalite Green. From here, I used Sybarite Green to highlight the more prominent edges of the scales and some wee dots of Gauss Blaster Green to the sharper corners.
Weapons and Armour
Being naturally armoured by their scaly skin, Saurus don't wear a great deal of armour, but like the weapons they wield, what they do is cast from otherworldy alloys that are refined and forged deep within the great Temple-ships and Ziggurats that the Seraphon call home.

Shield
I divided the shield into two layers of colour - the 'lower' silver layer and the 'upper' bronze layer. The silver was basecoated with Leadbelcher before being shaded with Nuln Oil. Once this was dry, I used a combination of stippling and feathering to layer the area back up with Leadbelcher before doing the same with Ironbreaker, this time focusing on the areas nearer the top of the curved surface that reflect more light. Finally I thinned down some Stormhost Silver and carefully painted a highlight at the very top of the silver area.
The bronze was a little bit more involved, but I think the final results are worth the extra steps. Beginning with a basecoat of Runelord Brass, which requires a few thinned layers to get a smooth consistent finish, I then applied a shade of Agrax Earthshade over the whole area. Once this had dried, I carefully layered Runelord Brass thinned with a little water back onto the bronze areas of the shield, leaving the lower half of the shield a little darker than the upper portions. The next step was to add a little more vibrancy into the mix to help suggest that this isn't some mundane metal that one might easily find in the Mortal Realms and I did this by painting Druchi Violet directly into all of the recesses of the bronze areas of the shield - don't worry if you make any mistakes doing this as you can tidy them up with Runelord Brass before you continue.
With the purple tone now beginning to be established, I applied a layer of Sycorax Bronze concentrating more on the areas that reflect more light and feathering the paint where I wanted to transition into the darker layer beneath to help make the layers less jarring. Once I was happy with this, I then began to add highlights to all of the hard edges of the bronze area, including the barbs on the lower edge of the shield using Canoptek Alloy before thinning down some Druchii Violet with water and glazing the lower portion of the curved surface at the bottom of the shield as well as the lower areas of the details in the middle of the shield and the lower part of the top section of the shield. I then went back and forth a bit glazing with Druchii Violet and highlighting with Canopetek Allow until I'd reached a point where I was happy with the whole thing. Make sure you allow glazes to dry before adding another layer because it's incredibly easy to 'pull up' a layer that hasn't dried properly and it can be a massive pain in the ass to fix.

Tassets
The polished bronze plate of the tassets was painted in much the same way as the bronze of the shield, but because they're much flatter surfaces I kept the glazes of Druchii Violet in the final stage much more focused, applying them only to the lower quarter and the area around the rivet at the top of each plate so as not to overwhelm them.
The crimson cord that hold the armour in place was basecoated with Gal Vorbak Red and then shaded with Nuln Oil. I then layered the cord with Gal Vorbak Red, followed by Wordbearers Red. I then highlighted it with Bugmans Glow and then used a glaze of thinned Carroberg Crimson to help tie everything together and mute the highlights a little.

Club
I wanted to emphasise the weight and lethality of the celestite club that the Saurus wields in its right hand so decided that I'd use a combination of a blued iron for the body of the weapon and bright bronze for the barbs along the sides as well as the head, hilt and pommel.
For the blued iron, I started out by basecoating the body of the club with Iron Warriors before shading it first with Agrax Earthshade and then when that had dried thoroughly shading it again with Nuln Oil. I then used Ironbreaker to highlight all of the edges of the iron area of the club, refining some with a little Stormhost Silver so that they'd appear to be more recent wear and tear on the metal. Once this was done, I thinned some Nuln Oil with water to make a glaze and applied it to a few patches of the metal to add a little more variation to the tone across the surface and help dull down a few of the scuffs and scrapes so that the weapon looks well used.
The barbs, guard, pommel and head of the club were all painted in the same way as the tassets and shield, but without the steps incorporating Druchii Violet.
Details

Face
The pale skin of the Saurus' face was painted in exactly the same way as its' underbelly, but as it's the focal point of the miniature, I special attention to the eye sockets and eyelids as well as the snout and jaw, adding a couple of extra layers of Pallid Wych Flesh highlights to make sure they were really well defined.
To get the fleshy pink of the inside of the mouth as well as the tongue and sagittal membranes (the skin that connects the upper and lower jaw at the corners of the mouth), I painted them with Screamer Pink which I shaded with Berserker Bloodshade. Once this was dry, I layered everything with Screamer Pink before applying a highlight of Pink Horror to the edges of the tongue and membranes. I then used a little Cadian Fleshtone to pick out the tip of the tongue before thinning down some Beserker Bloodshade with water and carefully adding a couple of glazes to tie everything back together.
The eyes were done almost completely with shade paints - after being basecoated with Ionrach Skin, I glazed them with Cassandora Yellow three times being sure to give each one time to fully dry before applying the next one. I then carefully painted some thinned Carroberg Crimson into the corners of the eyes before adding a wee dot of Abaddon Black to represent the pupils.

Teeth and Claws
I wanted the teeth and claws to be quite dark so that they would stand out from the pale greens on the miniature, so I started them off with a basecoat of Abaddon Black. Because I was working close to some very light colours, I made sure to keep the paint thinned down with water so that I could lift any rogue brushstrokes back off - this does mean it takes a few layers to get a smooth, even basecoat but I find it's better taking the time this way than rushing and then having black paint sploshed where you don't want it and having to take even more time to fix it.
With the basecoat established, the next steps were all nice and easy and began with a layer of Dark Reaper being applied to all of the teeth and claws - this was also thinned down a little just to help the paint flow more smoothly. Once I was happy with the first layer, I feathered on a highlight of Thunderhawk Blue before using Fenrisian Grey as an extreme highlight on the claws and to pick out the tips of the teeth so they look nice and sharp.
Anklets
The rhodium anklets that the Saurus is wearing were painted in a similar fashion to the silver area of the shield, beginning with a basecoat of Leadbelcher which was shaded with Nuln Oil. From here, I applied a layer of Leadbelcher to the back and outer sides of the anklets as these naturally reflect more light due to the way that the Saurus is standing. You could easily skip this step but I find that it helps to make the transition from the shaded metal to the brighter highlights less harsh and a bit more 'realistic'.
From here it was nice and quick to add some initial highlights to all of the edges of the metal with Ironbreaker before using Stormhost Silver to pick out some extreme highlights on the sides and back to finish things off.
Bracelet
On its' right wrist the Saurus wears a copper bracelet, perhaps imbued with properties that help it resist the magics of the ruinous powers. To get a nice ruddy tone to the metal, I started out with a basecoat of Balthasar Gold which I shaded with Agrax Earthshade. Once the shade had dried completely, I layered the bracelet thinned Hashut Copper. I concentrated the paint more on the 'upper' half the bracelet - feathering the Hashut Copper down into the shaded area as I did so to help produce a more realistic tonal transition from light to dark. Once I was happy with this, I then used some thinned Ironbreaker to pick out all of the hard edges of the bracelet.
Brown Leather
To complement the warmer tones of the copper and bronze metals I'd used on the miniature, I painted the binding of the club's hilt and the shield's grip to look like tan leather. I started out with a basecoat of Mournfang Brown which was shaded with Agrax Earthshade. I then feathered Mournfang Brown back onto the parts of the bindings that caught the most light before adding some highlights to the edges using Skrag Brown. To finish the leather up, I used Deathclaw Brown to add some extreme highlights to the edges of the bindings, but kept them fairly sparing as I wanted the leather to look matt and a bit worn rather than having a more patent appearance. I found that I wasn't entirely happy with how the leather was looking though so I thinned down some Agrax Earthshade with water and used it as a glaze to smooth the layers out a little
Base

Earth
Aft er a bit of thought I decided I'd paint the Saurus' base in a muddy brown to match the Skink I painted back at the end of last year. The earthen area started out with a basecoat of Dryad Bark to get a nice flat earthen colour. I applied this using a couple of layers both of which were thinned with a little water so they would flow in around the texture on the base more evenly.
Once the basecoat was completely dry, I then lightly drybrushed the earth first with Baneblade Brown and then with Karak Stone.
Shattered Rock
The chunk of sundered stone was basecoated with Dawnstone before being shaded with Agrax Earthshade. Once this was dry, I took some thinned Dawnstone and over the course of a few layers built up a grey tone I was happy with, being careful to leave some of the shaded grey showing though in places so the stone has a weather worn appearance. Once this was done, the next step was to start to add some highlights to the edges of the stone with Administrum Grey, I also stippled a little onto some of the flat areas of the stone to add a bit more variation to the tone. I then added a finer, final highlight of Grey Seer, paying particular attention to the corners of the stone.
To finish the stone up, I thinned a down a little Athonian Camoshade and Mortarion Grime with some water and glazed some random patches of the stone with them to add some natural tonal variation to the surfaces and suggest that there may be algae growing on them.

Skull
The bones and teeth of the half buried skull started out with a basecoat of Morghast Bone. Despite having pretty good coverage, this base paint will take at least two thin layers to get a smooth basecoat, but in some cases three or four will give you a better result. Once this was in place, Agrax Earthshade was painted directly into the eye socket and nasal cavity and once that had dried, the whole skull was shaded with Seraphim Sepia. I then thinned some Morghast Bone with water and layered it onto the skull before adding highlights using Ushabti Bone followed by Screaming Skull.
To help tie things together, I applied a glaze of thinned Dryad Bark to the areas of the skull nearest the ground to help to bed it into the base. I also added a few layers of the same glaze around the Saurus' feet and claws to help tie it to the base.
To finish the base off, I painted the rim with Abaddon Black and added some grass tufts and with that, the Saurus Warrior was now complete!
Battle Ready Guide
If you're looking to get your Saurus battle ready and on the table as quickly as possible, then you can follow these quick steps:
- Paint the underbelly Ionrach Skin
- Paint the arms and legs Orruk Flesh
- Paint the scales on the back Sons of Horus Green
- Paint the shield and armour Runelord Brass
- Paint the club Iron Warriors
- Paint the inside of the mouth, the tongue and the saggital membranes as well as the cords holding the armour on with Khorne Red
- Paint any bracelets and anklets Leadbelcher
- Carefully pick out the teeth and claws with Abaddon Black
- Shade the arms, legs and underbelly with Kroak Green
- Shade the scales on the back and the bracelets and anklets and club Nuln Oil
- Apply a texture paint like Stirland Mud, Astrogranite Debris or Agrellan Badlands to the base.
- Shade the shield, armour, cords, mouth and base with Agrax Earthshade
- Paint the base rim with either Abaddon Black or Steel Legion Drab
If you're assembling a full cohort of these savage warriors, then you can map the above colours across the whole unit fairly easily, perfect for if you want to get them painted up to a good basic standard quite quickly and then you can always go back and add extra details and highlights to the miniatures at a later date if you want to.

Comments
Post a Comment